Draw Like a Pro: A Friendly Step-by-Step Guide to Cartooning Basics
- Nov 14, 2025
- 7 min read

Draw Like a Pro: A Friendly Step-by-Step Guide to Cartooning
Cartooning can feel like a secret club: bold lines, exaggerated faces, and characters that instantly tell a story. But the truth is anyone can learn to cartoon — you don't need perfect perspective or a PhD in anatomy. What you need is curiosity, a few reliable techniques, and practice that’s fun instead of punishing.
This guide breaks the fundamentals into easy, actionable steps so you can start creating lively, expressive cartoons today. Whether you want to doodle punchy single-panel gags, design a recurring character for a webcomic, or simply loosen up your linework, these basics will give you a strong foundation and the confidence to experiment.
Start with Shapes — The Building Blocks of Every Cartoon

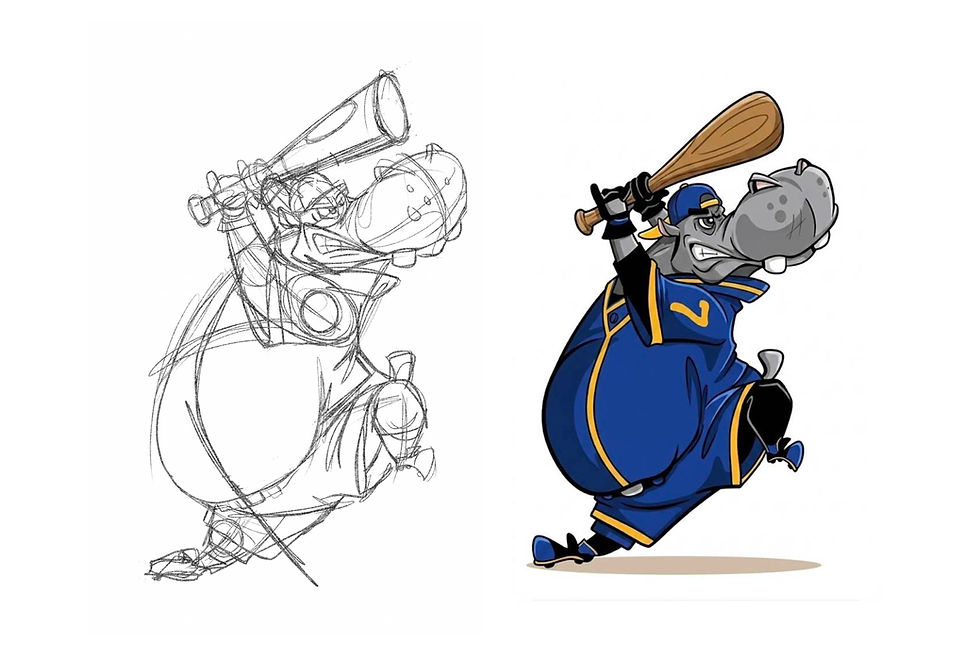
Every cartoon, no matter how detailed, begins with simple shapes.
Circles, ovals, rectangles, and triangles form the skeleton of characters and props. Thinking in shapes helps you simplify complex forms and keeps your design readable.
Break down subjects into shapes. Look at a character and ask: is the head a circle? Is the torso a soft rectangle? Are the hands little ovals? Sketch these lightly — they’re guides, not final lines.
Use shapes for personality. Round shapes feel friendly and soft (think chubby children, cute animals). Angular shapes read as sharp, villainous, or energetic (pointed eyebrows, tall spiky hair). Combine shapes to create contrast — a round head with a triangular beard gives instant personality.
Practice with quick studies. Spend 5–10 minutes drawing everyday objects using just three shapes each. For example: lamp = cylinder + cone + circle base. This trains your eye to simplify.
Turn shapes into volumes. Once you’re comfortable, give shapes dimension by drawing simple 3D forms: sphere, box, cylinder. This translates into better foreshortening and believable poses later.
Thumbnail characters. Before committing to a detailed design, do 6–12 tiny thumbnails (small, rough sketches) using shapes only. Explore silhouettes and choose the strongest, most readable design.
Why it matters: shapes help clarity. In cartoons, clear visual language means even a tiny thumbnail should read as a character with a distinct silhouette and attitude.
Master Exaggeration — The Heartbeat of Cartooning
Cartooning thrives on exaggeration. It’s what makes characters expressive and actions instantly readable. But exaggeration isn’t random distortion; it’s purposeful amplification of what communicates the idea best.
Identify the essence. For each pose or facial expression, decide what emotion or action you want to highlight. Is it surprise? Make the eyes wider and the eyebrows higher; shrink the mouth. Is it smugness? Tilt the head up and raise one eyebrow.
Scale and proportion. Play with proportions to emphasize traits. Large heads convey youthfulness or intellect; tiny legs make characters comical. Exaggerate limb length or torso width sparingly so the character still feels coherent.
Stretch and squash. Use “stretch and squash” to show motion. When a character jumps, stretch them vertically; when they hit the ground, squash them horizontally. This conveys energy and impact without complex rendering.
Facial feature exaggeration. Focus on the eyes, eyebrows, and mouth — these are the primary communicators of emotion. Pushing these features slightly beyond realism often increases clarity and comedic effect.
Timing in sequence. In comics or animation, exaggeration is controlled over time. Build up to a big expression or gag; the contrast between normal and exaggerated is what sells the joke.
Why it matters: exaggeration simplifies and amplifies what you want the viewer to feel. It makes your cartoons memorable and full of life.
Anatomy — Simplify, Don’t Copy a Medical Textbook

You don’t need to draw perfect anatomy to create believable characters — you need readable structure. Instead of memorizing every muscle, focus on functional parts: head, torso, pelvis, arms, and legs — and how they connect.
Learn gesture, not details. Start with gesture lines: a single flowing line captures the movement and energy of a pose. Make gestures quick and loose (30 seconds to 2 minutes). This builds dynamic, alive characters.
Use simplified skeletons. Think of the body in segments: head on a neck, ribcage as an oval, pelvis as a smaller box, limbs as cylinders. Joints (shoulders, elbows, knees) are hinge points that allow rotation.
Balance and weight. Show where the character’s weight rests. If a character stands on one leg, the pelvis tilts and the shoulders counterbalance. A slumped pose will have a curved spine and compressed ribs. This makes poses believable even when stylized.
Hands and feet — iconic shortcuts. Hands can be tricky. Use simplified mittens or basic four-finger gloves for speed. Feet can be wedge shapes or rounded boots. Learn a few reliable hand shapes for common gestures (open palm, fist, pointing).
Age and body types. Caricature the body: a child has a larger head-to-body ratio, an elder might be hunched with drooping shoulders. Varying body types adds diversity and interest to your cast.
Why it matters: understanding structure lets you bend the rules confidently. You’ll be able to distort features for comedic or dramatic effect while keeping the character believable.
Lines, Weight, and Inking — Make Every Stroke Count
Line quality is like a character’s voice — it sets tone. Thin, delicate lines feel different than bold, confident strokes. Learning to control line weight and confident inking elevates simple drawings into polished cartoons.
Practice line confidence. Draw straight, single-stroke lines instead of tentative, scratchy ones. Use your whole arm, not just the wrist, for longer strokes. Warm up with parallel lines, circles, and ellipses.
Vary line weight. Thicker lines can indicate shadow, foreground, or emphasis. Thinner lines suggest detail and distance. Try weight that follows the form — thicker on curves facing the viewer and thinner where the form recedes.
Clean up with selective erasing. Keep initial sketches loose. When inking, redraw or refine only where necessary. The contrast between loose pencil and clean ink can be appealing — don’t obsess over erasing every guide line if it helps your process.
Tools and materials. Traditional: experiment with brushes, fine liners, brush pens, and nib pens. Digital: try pressure-sensitive brushes to control weight. Find one tool that feels comfortable and learn its quirks.
Textures and hatching. Use cross-hatching, stippling, or simple fill shapes to suggest texture or shadow. In cartoons, blocks of shadow (silhouetted fills) are often stronger than delicate shading.
Why it matters: strong linework communicates clarity, mood, and emphasis. It’s the stage where your rough idea becomes a readable image.
Storytelling & Composition — Make the Page Work for You
Cartooning is storytelling. Whether one panel or many, every image should answer:
What happened? Who feels what? Where should the viewer look?
Composition and pacing guide the reader’s eye and deliver the joke or emotion.
Focus on the focal point. Decide the single most important element (a character’s face, an object). Use contrast, line weight, and placement to make it dominant. Everything else supports that focal point.
Use thumbnails for layout. Before drawing full panels, make tiny layout sketches to test composition and pacing. This helps with panel flow, camera angles, and where to place text.
Rule of thirds and silhouette. Place important elements along thirds and ensure silhouettes read clearly. A good silhouette instantly communicates the character and action without interior detail.
Panel rhythm and pacing. For multi-panel comics, vary panel sizes and beats. A small panel for a quick setup, then a large panel for the punchline creates impact. Use gutters (space between panels) to control timing — wider gutters slow the reader down.
Economy of detail. Only include what’s necessary. Backgrounds can be minimal; a few well-placed props suggest setting without cluttering the scene. Negative space is your friend — it gives the eye room to rest and amplifies the focal action.
Why it matters: even perfect drawings fall flat without clear storytelling. Composition turns your characters into actors on a stage and your drawing into a narrative.
Practice Techniques & Keeping It Fun — Build Skill, Not Frustration
Cartooning improves with smart, focused practice. The secret isn’t endless hours of repetition — it’s deliberate practice that targets weaknesses while keeping momentum and joy.
Daily short sessions. Do 15–30 minutes daily instead of occasional marathon sessions. Regular, short practice builds momentum and keeps your skills sharp.
Challenges and prompts. Try 30-day challenges, redraw prompts, or “one expression a day” exercises. Prompts push you to try unfamiliar poses or characters and fuel creativity.
Copy for learning, not theft. Study masters or favorite cartoonists: copy their work to understand decisions, then adapt those lessons into your own style. Always credit inspiration and avoid direct copying for publication.
Keep a sketchbook as a playground. Use it for messy ideas, failed attempts, and happy accidents. Some of your best designs will come from experiments with no stakes.
Get feedback and iterate. Share work with friends or online communities and take notes on recurring critiques. Iterate — redrawing a character with new knowledge 3–5 times cements learning faster than one “perfect” try.
Build a reference library. Save poses, expressions, and silhouettes you like. Organize reference folders for quick inspiration and realism checks.
Why it matters: steady, playful practice fuels progress without burning you out. Cartooning should be a skill and a source of joy, not a chore.
Conclusion
Cartooning is a delightful blend of observation, simplification, and joyful exaggeration. As you’ve seen throughout Draw Like a Pro: A Friendly Step-by-Step Guide to Cartooning, the path to improving your skills is simpler than it seems.
Start small: think in shapes, exaggerate with purpose, sketch gestures, refine confident lines, and compose each panel with storytelling in mind.
Above all, make practice playful — the more you enjoy drawing, the faster your skills will grow.
You don’t need perfect anatomy or expensive tools to create cartoons that connect. You just need curiosity, a pencil, and the willingness to make mistakes.
Now pick up your favorite pen and draw the first shape — a little world of characters is waiting for you.

.jpg)

Comments